Kubeflow Pipelinesで日本語テキスト分類の実験管理
機械学習ワークフロー管理ツールであるKubeflowのPipelines機能を使って日本語テキスト分類の実験管理を行います。
この記事ではKubeflowのチュートリアルに従ってKubeflowのクラスタを構築してPipelinesを動かし、最後に日本語のデータセットをKubeflow Pipelinesに実際に乗せて機械学習のワークフロー管理を行うところまでまとめていきます。
Kubeflow
Kubeflowとは
Kubeflowはデータの前処理、モデルの学習、モデルのデプロイといった機械学習の一連のワークフローをKubernetes上で実行するために設計されたツールです。
もともとはTensorFlow Extendedという名称で開発されていましたが、TensorFlowに限らない、より汎用的なMLワークフローの構築ツールにするためにKubeflowとして独立し、現在はXGBoostやPyTorchといったライブラリを扱うためのツールやサンプルも充実しています。
2020/01現在の最新バージョンは0.7で、ロードマップによると2020年の1月中には1.0がリリースされる予定です。
この記事ではv0.7のKubeflowを使っており、1.0リリースの暁には多少の変更が発生すると思いますが、そこだけご注意ください。
Kubeflowは機械学習のワークフローを構築するための様々なツールを内包しています。
例えば、Jupyter NotebookやPythonコードから簡単にTraining Jobを投げられるようにするFairingやハイパーパラメータチューニングやNeural Architecture Searchの機能を提供するKatib、データの前処理やモデルの学習からデプロイなど一連の処理をDAG(有向非巡回グラフ)で定義しそれをKubernetes上のPodで実行するPipelinesなどがあります。
 ※Kubeflow Overview(Kubeflow公式ページより: https://www.kubeflow.org/docs/started/kubeflow-overview/)
Pipelinesとは
ここでPipelinesについて少し掘り下げて解説します。
Pipelinesは先程も軽く紹介したとおり、一連の処理をDAGで定義しそれをKubernetes上で実行するツールのことです。Apache Airflowのようなもの、と書いた方がイメージしやすい方が多いかもしれません。(ただしPipelinesではデフォルトではバックのJob EngineにArgoを使用しています)

Pipelinesでは機械学習の一連の処理(前処理、モデルの学習、評価結果の保存、モデルのデプロイ)を行うことを前提に設計されています。
そのため、前処理やハイパーパラメータをチューニングしながら学習を回しTestセットでの評価結果を比較する、といった作業ができるように、各Jobごとのパラメータや評価結果の記録を行う実験管理の仕組みも提供しています。
GKEでKubeflowクラスタの構築
クラスタ構築
では実際にGoogle Cloud PlatformにKubeflowのクラスタを構築しようと思います。
クラウドへのデプロイ方法は公式ページに丁寧にまとめられているため、詳細に理解したい方はそちらもご参照ください。
最初にこちらのページに従ってOAuthの設定を行い、client_id とclient_secretを生成します。
認証の方式には「Cloud Identity-Aware Proxy(Cloud IAP)」と「Basic認証」の2種類のサンプルが用意されていますが、こちらの記事では推奨に従いCloud IAPを使った設定で進めていきます。
続いてクラスタを構築します。
Kubeflowの操作には専用のCLIであるkfctlを使用するので、リリースページからダウンロードして$PATHのディレクトリに配置しておきましょう。
まず事前に以下の変数を定義して設定に反映させておきます。
# KubeflowをデプロイするGCPプロジェクト
export PROJECT=<your GCP project ID>
gcloud config set project ${PROJECT}

# デプロイするゾーン
# GPUを使用するのでGPUを使用できるゾーン(e.g. asia-east1-a)の指定を推奨
# また指定したゾーンでのGPUを割り当てもしておくこと
# GPUの割り当てについてはこちらを参照: https://cloud.google.com/compute/docs/gpus/add-gpus?hl=ja
export ZONE=<your GCP zone>
gcloud config set compute/zone ${ZONE}

# Cloud IAPを用いた認証での設定ファイルをダウンロードするURI
export CONFIG_URI="https://raw.githubusercontent.com/kubeflow/manifests/v0.7-branch/kfdef/kfctl_gcp_iap.0.7.1.yaml"

# OAuthの設定の際に生成したClient IDとClient Secret
export CLIENT_ID=<CLIENT_ID from OAuth page>
export CLIENT_SECRET=<CLIENT_SECRET from OAuth page>

# Kubeflowクラスタの名前
# 'my-kubeflow' や 'kf-test'のように適当に
export KF_NAME=<your choice of name for the Kubeflow deployment>

# Kubeflowのリソース定義のyaml群をダウンロードしてくるディレクトリを設定
export BASE_DIR=<path to a base directory>
export KF_DIR=${BASE_DIR}/${KF_NAME}
以下のコマンドを実行すると、先程指定したディレクトリにYAML群がどっと配置されると思います。
$ mkdir -p ${KF_DIR}
$ cd ${KF_DIR}
$ kfctl build -V -f ${CONFIG_URI}
.
├── gcp_config
│   ├── cluster-kubeflow.yaml
│   ├── cluster.jinja
│   ├── cluster.jinja.schema
│   ├── iam_bindings.yaml
│   ├── storage-kubeflow.yaml
│   ├── storage.jinja
│   └── storage.jinja.schema
├── kfctl_gcp_iap.0.7.1.yaml
└── kustomize
    ├── api-service
    ├── application
    ├── application-crds
    ├── argo
     ...
私の環境ではGKEのKubernetesのバージョンが1.14系ではうまく動作しなかったため、gcp_config/cluster-kubeflow.yamlのresources.properties.cluster-versionを1.13に書き直してデプロイしました。
imports:
- path: cluster.jinja
resources:
- name: kubeflow
  properties:
    autoprovisioning-config:
      enabled: true
      max-accelerator:
      - count: 8
        type: nvidia-tesla-k80
      max-cpu: 20
      max-memory: 200
    cluster-version: "1.13" # ここを1.13に
    cpu-pool-enable-autoscaling: true
 ...
Config Fileの変数を設定しapplyすればGKEにKubeflowのクラスタが構築されます。
$ export CONFIG_FILE=${KF_DIR}/kfctl_gcp_iap.0.7.1.yaml
$ kfctl apply -V -f ${CONFIG_FILE}
GCPのコンソールからクラスタを選び、設定した名前のクラスタが立ち上がっていれば成功です。
ついでに「ワークロード」や「ServiceとIngress」も確認して全て無事に立ち上がっているか確認しておくとよいでしょう。
Workload Identityの設定
Kubeflowにおける認証認可の仕組みですが、v0.7からはGCPのWorkload Identityの仕組みに対応したため、公式ではこちらを使用することを推奨しています。
Workload Identityとは、KubernetesからGCPへの各種リソース(Cloud StorageやBigQueryなど)へのアクセスを管理するための仕組みで、
- Kubernetes内に「Kubernetes Service Account(KSA)」を作成
- 特定の名前空間のリソースがアクセスできるGCPリソースへの権限を付与した「Google Service Account(GSA)」を作成
- この2つを結びつける(Bind)
上記を行うことでKubernetesがアクセスできるGCPリソースを管理することができます。
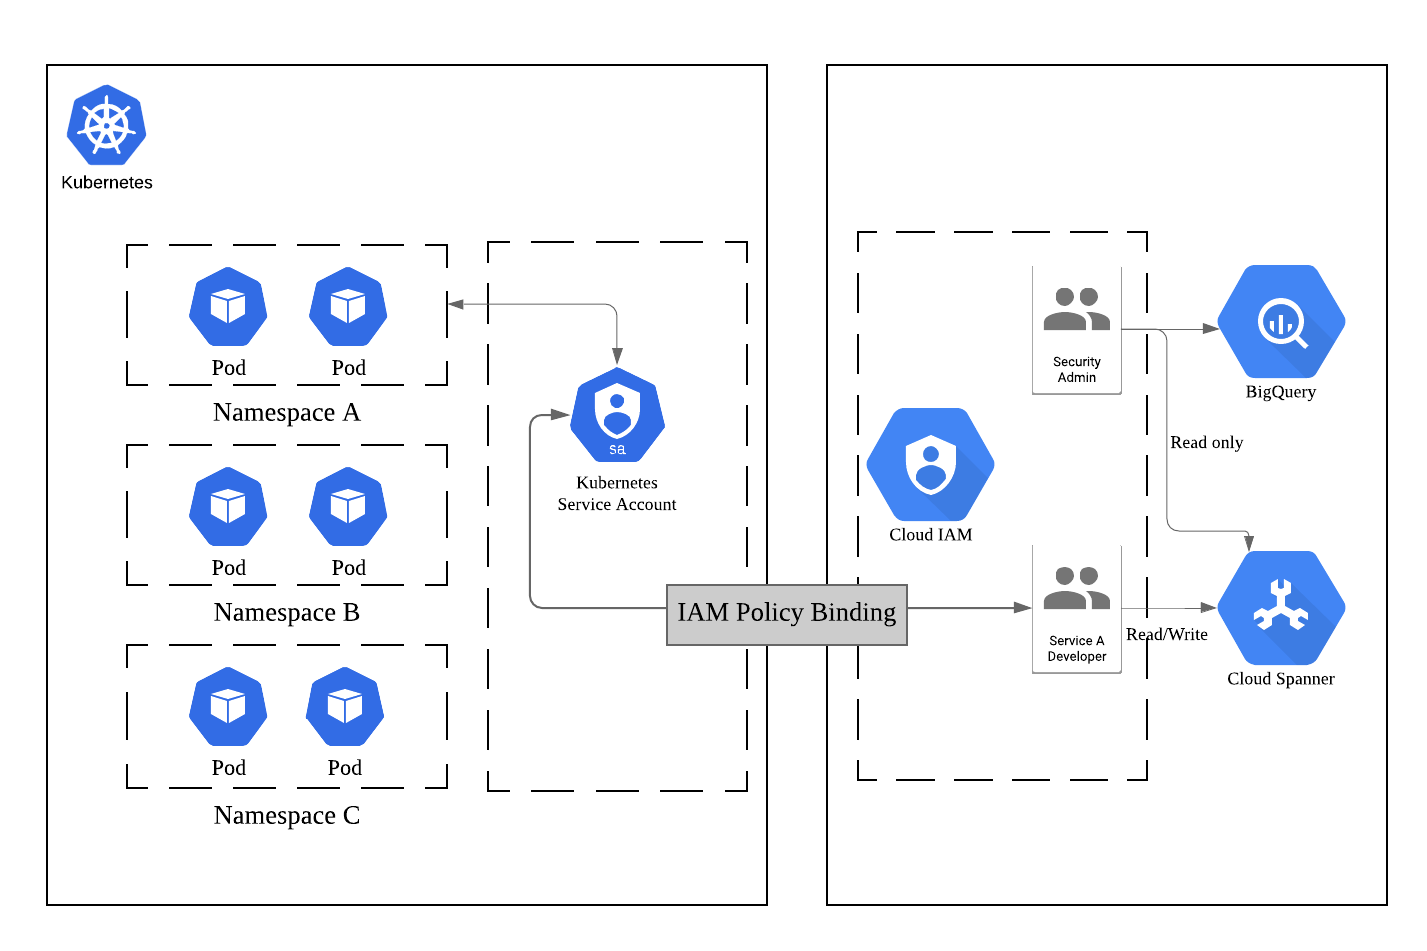
※「Kubernetes とGCPの世界をつなぐアクセス管理のはなし」より抜粋
ここでは新しく専用のGSAを作成し、それにKubeflowのクラスタがアクセスするGCPリソースへの適切な権限を付与、KSAへバインドすることでKubeflowがGCPリソースを扱えるようにします。
※参考: Authenticating Kubeflow to GCP
# GSAを作成する
# project-idにはGCPのプロジェクトを指定
gcloud iam service-accounts create user1-gcp@<project-id>.iam.gserviceaccount.com

# GSAにCloud Storageのstorage.admin権限を付与する
gcloud projects add-iam-policy-binding <project-id> \
  --member='serviceAccount:user1-gcp@<project-id>.iam.gserviceaccount.com' \
  --role='roles/storage.admin'

# KSAとGSAのBinding
gcloud iam service-accounts add-iam-policy-binding \
  user1-gcp@<project-id>.iam.gserviceaccount.com \
  --member='serviceAccount:<cluster-name>-admin@<project-id>.iam.gserviceaccount.com' --role='roles/owner'
またKubeflow Pipelinesでは専用のKSAが存在しており、PipelinesのSystem Accountであるml-pipeline-uiとPipelineの実行用のpipeline-runnerの2つが使用されます。
この2つのアカウントにもGCPリソースへの権限を設定していきます。
公式ページで提供されているスクリプトを使用すればインタラクティブにGSAアカウント作成とそのアカウントへのPipelinesのKSAのBindができます。
ml-pipeline-uiには<cluster-name>-kfp-systemというGSAが、pipeline-runnerには<cluster-name>-kfp-userというGSAがBIndされます。
上記のスクリプトを実行したあとに、以下を実行してこの2つのGSAにもCloud Storageへの権限を付与します。
※参考: Authenticating Pipelines to GCP
# System Accountへの権限付与
gcloud projects add-iam-policy-binding <project-id> \
  --member='serviceAccount:<cluster-name>-kfp-system@<project-id>.iam.gserviceaccount.com' \
  --role='roles/storage.admin'

# User Accountへの権限付与
gcloud projects add-iam-policy-binding <project-id> \
  --member='serviceAccount:<cluster-name>-kfp-user@<project-id>.iam.gserviceaccount.com' \
  --role='roles/storage.admin'
Pipelinesの基本的な使い方
まずはPipelinesの基本的な概念について説明します。
Pipeline/Experiment/Run
Pipelinesでは処理のDAGのことを「Pipeline」、Pipelineにパラメータや名称を挿入して実行したものを「Run」、このRunを紐付けてまとめておくものを「Experiment」と呼びます。
PipelineはClass、RunをInstanceと考えてもらうとわかりやすいかもしれません。
テキスト分類タスクを解くことを例にすると、テキスト分類の各種の実験をまとめておくText Classificationという名称のExperimentを作り、「学習 -> 評価」という流れのPipelineを作成、これに様々なハイパーパラメータを設定して実行したRunをexperimentに紐付けて管理していく、というやりかたになると思います。

PipelineとComponent
DAG全体をPipelineと呼ぶのに対し、グラフの個々のNodeは「Component」と呼びます。
個々のComponentはKubernetes上では別々のPodとしてデプロイされ、それぞれに「どのDocker Imageで起動し」「どんなコマンドを実行し」「どんな引数を渡すか」などを設定することができます。


PipelineとDSL
Pipelineの構築はPipelinesのSDKを使用して行います。
Pipelineの実体はYAMLファイルですが、複雑なPipelineを全てYAMLで1から作るのは大変なので、基本的にはPythonのDomain Specific Language(DSL)を書いてそれをコンパイルすることでPipelineのYAMLを生成します。
簡単な例で説明していきます。
Google Cloud Storage(GCS)からファイルを並行してダウンロードし、その内容をechoするというシンプルなPipelineを考えます。

上記のPipelineを構築するPythonコードは次のようになります。
元コード: https://github.com/kubeflow/pipelines/blob/master/samples/core/parallel_join/parallel_join.py
import kfp
from kfp import dsl

# GCSからファイルをダウンロードするComponentを生成する関数
def gcs_download_op(url):
    # dsl.ContainerOpに実行するDocker Imageやコンテナで実行するコマンドや
    # 引数を指定することでComponentを生成する
    return dsl.ContainerOp(
        name='GCS - Download',
        image='google/cloud-sdk:272.0.0',
        command=['sh', '-c'],
        arguments=['gsutil cat $0 | tee $1', url, '/tmp/results.txt'],
        # 下流(downstream)のタスクにデータを受け渡したいときは、
        # ファイルに書き出してそのパスをfile_outputsに渡すと値を渡せる
        file_outputs={
            'data': '/tmp/results.txt',
        }
    )


# 上流(upstream)でダウンロードしたファイルの中身をechoするComponentを生成する関数
def echo2_op(text1, text2):
    return dsl.ContainerOp(
        name='echo',
        image='library/bash:4.4.23',
        command=['sh', '-c'],
        arguments=['echo "Text 1: $0"; echo "Text 2: $1"', text1, text2]
    )


# Pipelineを構築する関数にはdsl.pipelineデコレータを付与する
@dsl.pipeline(
  name='Parallel pipeline',
  description='Download two messages in parallel and prints the concatenated result.'
)
def download_and_join(
    url1='gs://ml-pipeline-playground/shakespeare1.txt',
    url2='gs://ml-pipeline-playground/shakespeare2.txt'
):
    """A three-step pipeline with first two running in parallel."""

    download1_task = gcs_download_op(url1)
    download2_task = gcs_download_op(url2)

    # 上流タスクのoutputを受け取ってタスクを実行
    echo_task = echo2_op(download1_task.output, download2_task.output)

if __name__ == '__main__':
    # Pipelineを定義するYAMLを生成
    kfp.compiler.Compiler().compile(download_and_join, __file__ + '.yaml')
このYAMLをWeb UIからアップロードすればPipelineを登録することができます。
@dsl.pipelineデコレータを付与した関数への引数は、PipelineからRunを生成する際に外挿するパラメータとなります。

Pythonコード中のコメントにも書きましたが、上流のComponentから下流のComponentへ値を渡すことも可能です。その際は上流のComponentで渡したい値をファイルに書き込み、そのファイルのパスをdsl.ContainerOpのfile_outputs引数に記述することでファイルの中の値を渡すことができます。
ただし、ファイルに書き込んだ文字列しか渡すことができないため、もしcsvやモデルといったデータを渡したい場合は一度GCSなどに書き込んでそのパスを渡すとよいでしょう。
実験管理としてのKubeflow Pipelines
PipelinesではRunで使用したパラメータを記録したり、Runの中で学習させたモデルのテストデータでのAccuracyを記録したり、Run同士を比較しどのパラメータがどんな影響を与えたかを分析するといった実験管理の仕組みも兼ね備えています。

またConfusion MatrixやROC曲線での可視化のためのサンプルも用意されています。


可視化には他にもテーブル形式での表示、マークダウン形式での表示、さらにはTensorBoardの可視化に加え、自分でPythonコードを差し込んで図などを差し込むことも可能です。
IBIS2019での機械学習工学セッションにおけるAki Arigaさんの「Challenges for Machine Learning Systems toward Continuous Improvement」の発表では、MLOpsを行う上では「Reproducible」「Accountable」「Collaborative」「Continuous」の4つの要素が重要であると述べられています。
Manifest for ML in production
[Marsden, 2019]より翻訳して引用
- Reproducible
- 9ヶ月前に学習したモデルが全く同じ環境で、同じデータで再学習でき、ほぼ同じ(数%以内の差)の精度を得られるべきである
- Accountable
- 本番で稼働しているどのモデルも、作成時のパラメータと学習データ、更に生データまでトレースできるべきである
- Collaborative
- 他の同僚の作ったモデルを本人に聞くことなく改善でき、非同期で改善とコードやデータのマージができるべきである
- Continuous
- 手動での作業0でモデルはデプロイできるべき。統計的にモニタリングできるべき
※Challenges for Machine Learning Systems toward Continuous Improvementより抜粋
Kubeflowでは、実験の青写真であるPipelineにパラメータを外挿してRunを生成するという方式により「Reproducible」「Accountable」を、学習からサービングまでをPipelineに含めることで「Continuous」を満たしているのではないかと思います。
(「Collaborative」の要素についてはKubeflowだけではカバーしきれていないと考えています)
しかし、学習時のCheck pointや最終的なモデル、Vocabularyや前処理パイプラインといったファイル群をどのようにGCSなどにどのように保存するかはComponentの中で記述する必要があり、これはすなわちKubeflowの管轄外であるためGCSへの書き込み規則などを事前に定義しておかないと無秩序にファイルがおかれていくことが予想されます。
これはストレージへの保存方法がOSS側で決められているMLflowとは対称的かなと思います。
日本語テキスト分類 with Pipelines
ではここからは実際にKubeflow Pipelinesを使って、Livedoorの日本語コーパスのテキスト分類の実験を行っていきます。
Pipelineの全体像
Pipelineとしては「学習を回してモデルを保存するTrainとComponent」「Train Componentで保存したモデルをダウンロードしてきてテストデータで評価するTest Comoponent」の2つからなるシンプルな構成です。
Test ComponentではAccuracyの記録とConfusion Matrixの生成を行います。

データの準備
データをTrain/Validation/Testの3つに分割します。
import os
from pathlib import Path
import pandas as pd
from sklearn.model_selection import train_test_split


titles, articles, labels = [], [], []
news_list = ['dokujo-tsushin', 'it-life-hack', 'kaden-channel', 'livedoor-homme', 'movie-enter', 'peachy', 'smax', 'sports-watch', 'topic-news']
for i, media in enumerate(news_list):
    files = os.listdir(Path('text', media))
    for file_name in files:
        if file_name == 'LICENSE.txt':
            continue
        with Path('text', media, file_name).open(encoding='utf-8') as f:
            lines = [line for line in f]
            title = lines[2].replace('\n', '')
            text = ''.join(lines[3:])
            titles.append(title)
            articles.append(text.replace('\n', ''))
            labels.append(i)


df = pd.DataFrame({'title': titles, 'article': articles, 'label': labels})

train_X, test_X, train_y, test_y = train_test_split(df[['article', 'title']], df['label'], stratify=df['label'], test_size=0.3, random_state=0)
val_X, test_X, val_y, test_y = train_test_split(test_X[['article', 'title']], test_y, stratify=test_y, test_size=0.5, random_state=0)

train_X.to_csv('train.csv', index=False)
val_X.to_csv('val.csv', index=False)
test_X.to_csv('test.csv', index=False)

train_y.to_csv('train_label.csv', index=False)
val_y.to_csv('val_label.csv', index=False)
test_y.to_csv('test_label.csv', index=False)
Train/Val/Testの3つのデータセットをgs://ymym-kubeflow-demo/livedoor-dataのようなパスに保存しておきます。
学習用コード
学習コードの記述にはAllenNLPを使用しました。
モデルコードなどは「AllenNLPで簡単にDeepな自然言語処理」を参考にさせて頂きました。
src/model.py
import torch
import torch.nn as nn
import torch.nn.functional as F
from allennlp.models import Model
from allennlp.nn.util import get_text_field_mask
from allennlp.modules.text_field_embedders import TextFieldEmbedder
from allennlp.data.vocabulary import Vocabulary
from allennlp.modules.seq2seq_encoders import Seq2SeqEncoder
from typing import Dict


class Attention(nn.Module):
    def __init__(self, input_size: int, out: int = 24) -> None:
        super(Attention, self).__init__()
        self.input_size = input_size
        self.linear = nn.Sequential(
            nn.Linear(input_size, out),
            nn.ReLU(True),
            nn.Linear(out, 1)
        )

    def forward(self, encoder_outputs: torch.Tensor):
        bs = encoder_outputs.size(0)
        out = self.linear(encoder_outputs.view(-1, self.input_size))
        return F.softmax(out.view(bs, -1), dim=1).unsqueeze(2)


class ClassifierWithAttn(Model):
    def __init__(self, word_embeddings: TextFieldEmbedder, encoder: Seq2SeqEncoder, vocab: Vocabulary) -> None:
        super().__init__(vocab)
        self.word_embeddings = word_embeddings
        self.encoder = encoder
        self.attention = Attention(self.encoder.get_output_dim())
        self.linear = nn.Linear(self.encoder.get_output_dim(), 9)
        self.dropout = nn.Dropout(0.5)
        self.loss = nn.CrossEntropyLoss()

    def forward(self, tokens: Dict[str, torch.Tensor], label: torch.Tensor = None) -> Dict[str, torch.Tensor]:
        mask = get_text_field_mask(tokens)
        embeddings = self.word_embeddings(tokens)
        encoder_outputs = self.encoder(embeddings, mask)  # (batch_size, seq_len, hidden_size)
        attentions = self.attattentionn(encoder_outputs)  # (batch_size, seq_len, 1)
        feats = (encoder_outputs * attentions).sum(dim=1)  # (batch_size, hidden_size)
        logits = self.linear(self.dropout(feats))  # (batch_size, 9)
        output = {"logits": logits, "attns": attns}

        if label is not None:
            loss = self.loss(logits, label.long())
            output["loss"] = loss

        output['encoder_outputs'] = encoder_outputs
        return output
TrainとTestのコードです。
今回は同一のファイルにTrainとTestのコードをまとめて、どちらを動かすかを実行時の引数で選択するようにしています。
src/train_test.py
from google.cloud import storage
import pandas as pd
import chariot.transformer as ct
from chariot.preprocessor import Preprocessor
from allennlp.data import Instance
from allennlp.data.tokenizers import Token
from allennlp.data.vocabulary import Vocabulary
from allennlp.data.fields import TextField, LabelField
from allennlp.data.token_indexers import SingleIdTokenIndexer
from allennlp.data.iterators import BucketIterator
from allennlp.common import Params
from allennlp.modules.seq2seq_encoders import Seq2SeqEncoder, PytorchSeq2SeqWrapper
from allennlp.modules.text_field_embedders import TextFieldEmbedder
from allennlp.modules.token_embedders import Embedding
from allennlp.modules.text_field_embedders import BasicTextFieldEmbedder
import torch
from allennlp.training.trainer import Trainer
import torch.nn as nn
import torch.optim as optim
import logging
from datetime import datetime
from pathlib import Path
from sklearn.metrics import accuracy_score, confusion_matrix
import numpy as np
from tqdm import tqdm
import json
import argparse

from model import ClassifierWithAttn

logger = logging.getLogger(__name__)


PROJECT = '<your-project-id>'
BUCKET_NAME = 'ymym-kubeflow-demo'

# データセットをGCSからダウンロードする
def download_dataset(dataset):
    if dataset not in ['train', 'val', 'test']:
        raise ValueError('dataset is allowed train/val/test')

    client = storage.Client(PROJECT)
    bucket = client.get_bucket(BUCKET_NAME)
    blob = bucket.blob('livedoor-data/{}.csv'.format(dataset))
    blob.download_to_filename('./{}.csv'.format(dataset))

    blob = bucket.blob('livedoor-data/{}_label.csv'.format(dataset))
    blob.download_to_filename('./{}_label.csv'.format(dataset))

    data_df = pd.read_csv('{}.csv'.format(dataset))
    label_df = pd.read_csv('{}_label.csv'.format(dataset), squeeze=True, header=None)
    label_df = label_df.astype('int64')
    return data_df, label_df


# ファイルをGCSへアップロードする
def upload_file(gcs_path, local_path):
    client = storage.Client(PROJECT)
    bucket = client.get_bucket(BUCKET_NAME)
    blob = bucket.blob(gcs_path)
    blob.upload_from_filename(local_path)


# ファイルをGCSからダウンロードする
def download_file(gcs_path, local_path):
    p_path = Path(local_path).parent
    if not p_path.exists():
        p_path.mkdir(parents=True)

    client = storage.Client(PROJECT)
    bucket = client.get_bucket(BUCKET_NAME)
    blob = bucket.blob(gcs_path)
    blob.download_to_filename(local_path)


# AllenNLP用に文章からInstanceを生成する
def text_to_instance(word_list, label):
    tokens = [Token(word) for word in word_list]
    word_sentence_field = TextField(tokens, {"tokens": SingleIdTokenIndexer()})
    fields = {"tokens": word_sentence_field}
    if label is not None:
        label_field = LabelField(label, skip_indexing=True)
        fields["label"] = label_field
    return Instance(fields)


# モデルを保存する
def save_model(state, file_name):
    p_path = Path(file_name).parent
    if not p_path.exists():
        p_path.mkdir(parents=True)
    torch.save(state, file_name)


# モデルをロードする
def load_model(model, file_name):
    state_dict = torch.load(file_name, map_location='cpu')
    model.load_state_dict(state_dict)


# 学習
def train(args):
    train_X, train_y = download_dataset('train')
    val_X, val_y = download_dataset('val')

    # テキストにUnicode NormalizeをかけてTokenize
    preprocessor = Preprocessor()
    preprocessor\
        .stack(ct.text.UnicodeNormalizer())\
        .stack(ct.Tokenizer("ja"))\
        .fit(train_X)
    processed = preprocessor.transform(train_X['article'])
    val_processed = preprocessor.transform(val_X['article'])

    train_dataset = [text_to_instance([token.surface for token in document], label) for document, label in zip(processed, train_y)]
    val_dataset = [text_to_instance([token.surface for token in document], label) for document, label in zip(val_processed, val_y)]

    # Vocabularyを生成
    VOCAB_SIZE = args.vocab_size
    vocab = Vocabulary.from_instances(train_dataset + val_dataset, max_vocab_size=VOCAB_SIZE)

    BATCH_SIZE = args.batch_size

    # パディング済みミニバッチを生成してくれるIterator
    iterator = BucketIterator(batch_size=BATCH_SIZE, sorting_keys=[("tokens", "num_tokens")])
    iterator.index_with(vocab)

    # 東北大が提供している学習済み日本語 Wikipedia エンティティベクトルを使用する
    # http://www.cl.ecei.tohoku.ac.jp/~m-suzuki/jawiki_vector/
    params = Params({
          'embedding_dim': 200,
          'padding_index': 0,
          'pretrained_file': 'jawiki.entity_vectors.200d.txt',
          'norm_type': 2})

    token_embedding = Embedding.from_params(vocab=vocab, params=params)
    HIDDEN_SIZE = args.hidden_size

    word_embeddings: TextFieldEmbedder = BasicTextFieldEmbedder({"tokens": token_embedding})
    encoder: Seq2SeqEncoder = PytorchSeq2SeqWrapper(nn.LSTM(word_embeddings.get_output_dim(),
                                                    HIDDEN_SIZE, bidirectional=True, batch_first=True))
    model = ClassifierWithAttn(word_embeddings, encoder, vocab)
    model.train()

    USE_GPU = True

    if USE_GPU and torch.cuda.is_available():
        model = model.cuda(0)

    LR = args.lr
    EPOCHS = args.epoch
    patience = args.early_stopping_num if args.early_stopping_num > 0 else None

    optimizer = optim.Adam(model.parameters(), lr=LR)
    trainer = Trainer(
        model=model,
        optimizer=optimizer,
        iterator=iterator,
        train_dataset=train_dataset,
        validation_dataset=val_dataset,
        patience=patience,
        cuda_device=0 if USE_GPU else -1,
        num_epochs=EPOCHS
    )
    metrics = trainer.train()
    logger.info(metrics)

    # モデルの保存
    # モデル、chariotの前処理パイプライン、Vocabularyの3つをGCSへ保存する
    # GCSの所定のディレクトリにtime stampの名前のディレクトリを作成して保存する
    model.eval()
    today = datetime.now().strftime('%Y%m%d-%H%M%S')
    model_name = 'clf.model'
    save_model(model.state_dict(), model_name)
    vocab.save_to_files("vocabulary")
    processor_name = 'preprocessor.pkl'
    preprocessor.save(processor_name)
    gcs_path = 'artifacts/{}'.format(today)
    upload_file('{}/{}'.format(gcs_path, model_name), model_name)
    upload_file('{}/{}'.format(gcs_path, 'vocabulary/tokens.txt'), 'vocabulary/tokens.txt')
    upload_file('{}/{}'.format(gcs_path, 'vocabulary/non_padded_namespaces.txt'), 'vocabulary/non_padded_namespaces.txt')
    upload_file('{}/{}'.format(gcs_path, processor_name), processor_name)

    # 保存したディレクトリの名前(time stamp)を下流タスクへ渡すためにファイル書き出し
    with open('/output.txt', 'w') as f:
        f.write(today)


def test(args):
    test_X, test_y = download_dataset('test')

    # モデル、前処理パイプライン、VocabularyをGCSからダウンロードしてロード
    path = args.output
    gcs_path = 'artifacts/{}'.format(path)
    download_file('{}/clf.model'.format(gcs_path), 'clf.model')
    download_file('{}/vocabulary/tokens.txt'.format(gcs_path), 'vocabulary/tokens.txt')
    download_file('{}/vocabulary/non_padded_namespaces.txt'.format(gcs_path), 'vocabulary/non_padded_namespaces.txt')
    vocab = Vocabulary.from_files("vocabulary")
    download_file('{}/preprocessor.pkl'.format(gcs_path), 'preprocessor.pkl')
    preprocessor = Preprocessor.load("preprocessor.pkl")

    test_processed = preprocessor.transform(test_X['article'])
    test_dataset = [text_to_instance([token.surface for token in document], label) for document, label in zip(test_processed, test_y)]

    params = Params({
          'embedding_dim': 200,
          'padding_index': 0,
          'pretrained_file': 'jawiki.entity_vectors.200d.txt',
          'norm_type': 2})

    token_embedding = Embedding.from_params(vocab=vocab, params=params)
    HIDDEN_SIZE = args.hidden_size

    word_embeddings: TextFieldEmbedder = BasicTextFieldEmbedder({"tokens": token_embedding})
    encoder: Seq2SeqEncoder = PytorchSeq2SeqWrapper(nn.LSTM(word_embeddings.get_output_dim(),
                                                    HIDDEN_SIZE, bidirectional=True, batch_first=True))
    model = ClassifierWithAttn(word_embeddings, encoder, vocab)
    load_model(model, 'clf.model')

    # 推論
    predicted = [model.forward_on_instance(d)['logits'].argmax() for d in tqdm(test_dataset)]

    # Accuracyの計算
    target = test_y.values
    predict = np.array(predicted)
    # accuracy
    accuracy = accuracy_score(target, predict)

    # Confusion matrixを生成
    # https://github.com/kubeflow/pipelines/blob/master/components/local/confusion_matrix/src/confusion_matrix.py
    cm = confusion_matrix(target, predict, labels=list(range(9)))
    news_list = ['dokujo-tsushin', 'it-life-hack', 'kaden-channel', 'livedoor-homme', 'movie-enter', 'peachy', 'smax', 'sports-watch', 'topic-news']
    data = []
    for target_index, target_row in enumerate(cm):
        for predicted_index, count in enumerate(target_row):
            data.append((news_list[target_index], news_list[predicted_index], count))

    df_cm = pd.DataFrame(data, columns=['target', 'predicted', 'count'])
    cm_file = 'confusion_matrix.csv'
    with open(cm_file, 'w') as f:
        df_cm.to_csv(f, columns=['target', 'predicted', 'count'], header=False, index=False)

    # Confusion MatrixをGCSへ保存
    upload_file('{}/{}'.format(gcs_path, cm_file), cm_file)

    metadata = {
        'outputs': [{
            'type': 'confusion_matrix',
            'format': 'csv',
            'schema': [
                {'name': 'target', 'type': 'CATEGORY'},
                {'name': 'predicted', 'type': 'CATEGORY'},
                {'name': 'count', 'type': 'NUMBER'},
            ],
            # 保存したGCSのパスを指定する
            'source': 'gs://{}/{}/{}'.format(BUCKET_NAME, gcs_path, cm_file),
            'labels': news_list,
            }]
        }
    # meta dataをjsonに書き出し、DSLでfile_outputsに指定することでUIからConfusion Matrixを確認できる
    with open('/mlpipeline-ui-metadata.json', 'w') as f:
        json.dump(metadata, f)

    metrics = {
        'metrics': [{
        'name': 'accuracy-score',  # The name of the metric. Visualized as the column name in the runs table.
        'numberValue':  accuracy,  # The value of the metric. Must be a numeric value.
        'format': "PERCENTAGE",    # The optional format of the metric. Supported values are "RAW" (displayed in raw format) and "PERCENTAGE" (displayed in percentage format).
        }]
    }
    # accuracyも同様
    with open('/mlpipeline-metrics.json', 'w') as f:
        json.dump(metrics, f)


if __name__ == '__main__':
    parser = argparse.ArgumentParser()
    parser.add_argument('--mode', type=str, help='Set "train" or "test"')
    parser.add_argument('--output', type=str, help='parameters from upstream task')
    parser.add_argument('--vocab_size', type=int, default=40000, help='Vocaurary size')
    parser.add_argument('--batch_size', type=int, default=32, help='Batch size')
    parser.add_argument('--hidden_size', type=int, default=512, help='Hidden size of LSTM')
    parser.add_argument('--epoch', type=int, default=30, help='Num of epochs')
    parser.add_argument('--lr', type=float, default=0.01, help='learning rate')
    parser.add_argument('--early_stopping_num', type=int, default=10, help='Num of patience')
    args = parser.parse_args()

    if args.mode == 'train':
        train(args)
    elif args.mode == 'test':
        test(args)
    else:
        raise ValueError('Set "mode" args train or test')
続いてこのtrain_test.pyを実行するDocker Imageを作成します。
Component用Dockerfile作成
まずGPUでAllenNLPを動作させるために、CUDAとCuDNNが入ったnvidia提供のDocker Imageをベースに、形態素解析器、辞書、PythonライブラリをインストールさせたDockerfileを作成します。
Dockerfile
FROM nvidia/cuda:10.1-cudnn7-devel

ENV DEBIAN_FRONTEND=noninteractive \
    TZ=Asia/Tokyo
RUN ln -fs /usr/share/zoneinfo/Asia/Tokyo /etc/localtime

RUN apt-get update \
    &&  apt-get install -yq --no-install-recommends \
        curl \
        language-pack-ja \
        libreadline-dev \
        wget \
        tzdata \
        git \
        file \
        python3 \
        python3-dev \
        python3-pip

ENV LANGUAGE=ja_JP.UTF-8 \
    LANG=ja_JP.UTF-8 \
    LC_ALL=ja_JP.UTF-8

ARG MECABV=0.996
ARG IPADICV=2.7.0-20070801
# install MeCab and ipadic
RUN wget -O mecab-${MECABV}.tar.gz "https://drive.google.com/uc?export=download&id=0B4y35FiV1wh7cENtOXlicTFaRUE" \
    && tar xvzf mecab-${MECABV}.tar.gz \
    && cd mecab-${MECABV} \
    && ./configure --enable-utf8-only \
    && make && make install \
    && cd ../ \
    && mkdir -p /usr/local/lib/mecab/dic \
    && chmod 777 /usr/local/lib/mecab/dic \
    && ldconfig \
    && wget -O mecab-ipadic-${IPADICV}.tar.gz "https://drive.google.com/uc?export=download&id=0B4y35FiV1wh7MWVlSDBCSXZMTXM" \
    && tar xvzf mecab-ipadic-${IPADICV}.tar.gz \
    && cd mecab-ipadic-${IPADICV} \
    && ./configure --with-charset=utf8 \
    && make && make install \
    && cd ../ \
    && rm -rf mecab-${MECABV} mecab-${MECABV}.tar.gz mecab-ipadic-${IPADICV} mecab-ipadic-${IPADICV}.tar.gz
# install NEologd
RUN git clone --depth 1 https://github.com/neologd/mecab-ipadic-neologd.git \
    && cd mecab-ipadic-neologd \
    && ./bin/install-mecab-ipadic-neologd -n -y \
    && cd ../ \
    && rm -rf mecab-ipadic-neologd

RUN pip3 install \
     setuptools \
     wheel

RUN pip3 install \
     numpy \
     scipy \
     pandas \
     torch \
     torchvision \
     allennlp \
     chariot \
     janome \
     mecab-python3==0.7 \
     google-cloud-storage
このGPU+Mecab+PyTorch(AllenNLP)をベースとするためにこのImageをGoogle Container Registry(GCR)に登録します。
$ TAG=v0.1.1
$ docker build -t pytorch-gpu -f Dockerfile .
$ docker tag pytorch-gpu gcr.io/<project>/pytorch-gpu:$TAG
$ docker push gcr.io/<project>/pytorch-gpu:$TAG

$ docker tag pytorch-gpu gcr.io/<project>/pytorch-gpu:latest
$ docker push gcr.io/<project>/pytorch-gpu:latest
このDockerfileをベースにして、実際にJobを動かすためのDockerfileも作成していきます。
Dockerfile-job
# 先程のイメージをベースにする
FROM gcr.io/ymym3412/pytorch-gpu

COPY ./src /opt/src

WORKDIR /opt/src

# 東北大のword vectorをダウンロード/展開
RUN wget https://github.com/singletongue/WikiEntVec/releases/download/20190520/jawiki.entity_vectors.200d.txt.bz2

RUN bzip2 -d jawiki.entity_vectors.200d.txt.bz2
こちらもGCRに登録
$ TAG=v0.1.1
$ docker build -t livedoor-clf -f Dockerfile-job .
$ docker tag livedoor-clf gcr.io/<project>/livedoor-clf:$TAG
$ docker push gcr.io/<project>/livedoor-clf:$TAG

$ docker tag livedoor-clf gcr.io/<project>/livedoor-clf:latest
$ docker push gcr.io/<project>/livedoor-clf:latest
Pipeline用DSL作成
作成したJob用のDocker Imageを使ってPipelineを作成していきます。
dsl.ContainerOpの引数で先程作成したJob用のイメージを指定しつつ、Train/Test時の引数をargumentsに渡します。
またTrainからTestに渡すパラメータをTrainのfile_outputsに、TestでAccuracyとConfusion Matrixの表示に使うパラメータをTestのfile_outputsに渡します。
TrainのComponentではGPUを使ったNodeを使用したいため、TrainのComponentに以下のような記述を追加します。
# GPUのlimitを1に設定
train = dsl.ContainerOp(...).set_gpu_limit(1)
# このpodがGPUのノードプールのノードで作成されるようにNodeSelectorを設定する
train.add_node_selector_constraint('cloud.google.com/gke-nodepool', 'gpu-pool')
DSLのコードは全体としては以下のようになります。
src/dsl.py
import kfp.dsl as dsl
import kfp.gcp as gcp
import kfp.compiler as compiler

platform = 'GCP'

@dsl.pipeline(
    name='livedoor',
    description='A pipeline to train livedoor blog classification'
)
def clf_pipeline(vocab_size=40000,
                 batch_size=32,
                 hidden_size=512,
                 lr=0.01,
                 epoch=30,
                 early_stopping_num=10):

    train = dsl.ContainerOp(
            name='train',
            image='gcr.io/ymym3412/livedoor-clf:latest',
            command=['python3', 'train_test.py'],
            arguments=[
                    '--mode', 'train',
                    '--vocab_size', vocab_size,
                    '--batch_size', batch_size,
                    '--hidden_size', hidden_size,
                    '--lr', lr,
                    '--epoch', epoch,
                    '--early_stopping_num', early_stopping_num
            ],
            file_outputs={
                        'output': '/output.txt',
            }
    ).set_gpu_limit(1)
    train.add_node_selector_constraint('cloud.google.com/gke-nodepool', 'gpu-pool')
    out = train.outputs['output']

    test = dsl.ContainerOp(
            name='test',
            image='gcr.io/ymym3412/livedoor-clf:latest',
            command=['python3', 'train.py'],
            arguments=[
                    '--mode', 'test',
                    '--hidden_size', hidden_size,
                    '--output', out
            ],
            file_outputs={
                        'MLPipeline Metrics': '/mlpipeline-metrics.json',
                        'MLPipeline UI metadata': '/mlpipeline-ui-metadata.json'
            }
    )
    # Trainのあとに実行されるよう依存関係を設定する
    test.after(train)

    steps = [train, test]
    for step in steps:
        if platform == 'GCP':
            step.apply(gcp.use_gcp_secret('user-gcp-sa'))


if __name__ == '__main__':
    compiler.Compiler().compile(clf_pipeline, __file__ + '.tar.gz')
上記のPythonコードを実行して得られるファイルをUIでアップロードすればPipelineの登録完了です。
結果の確認
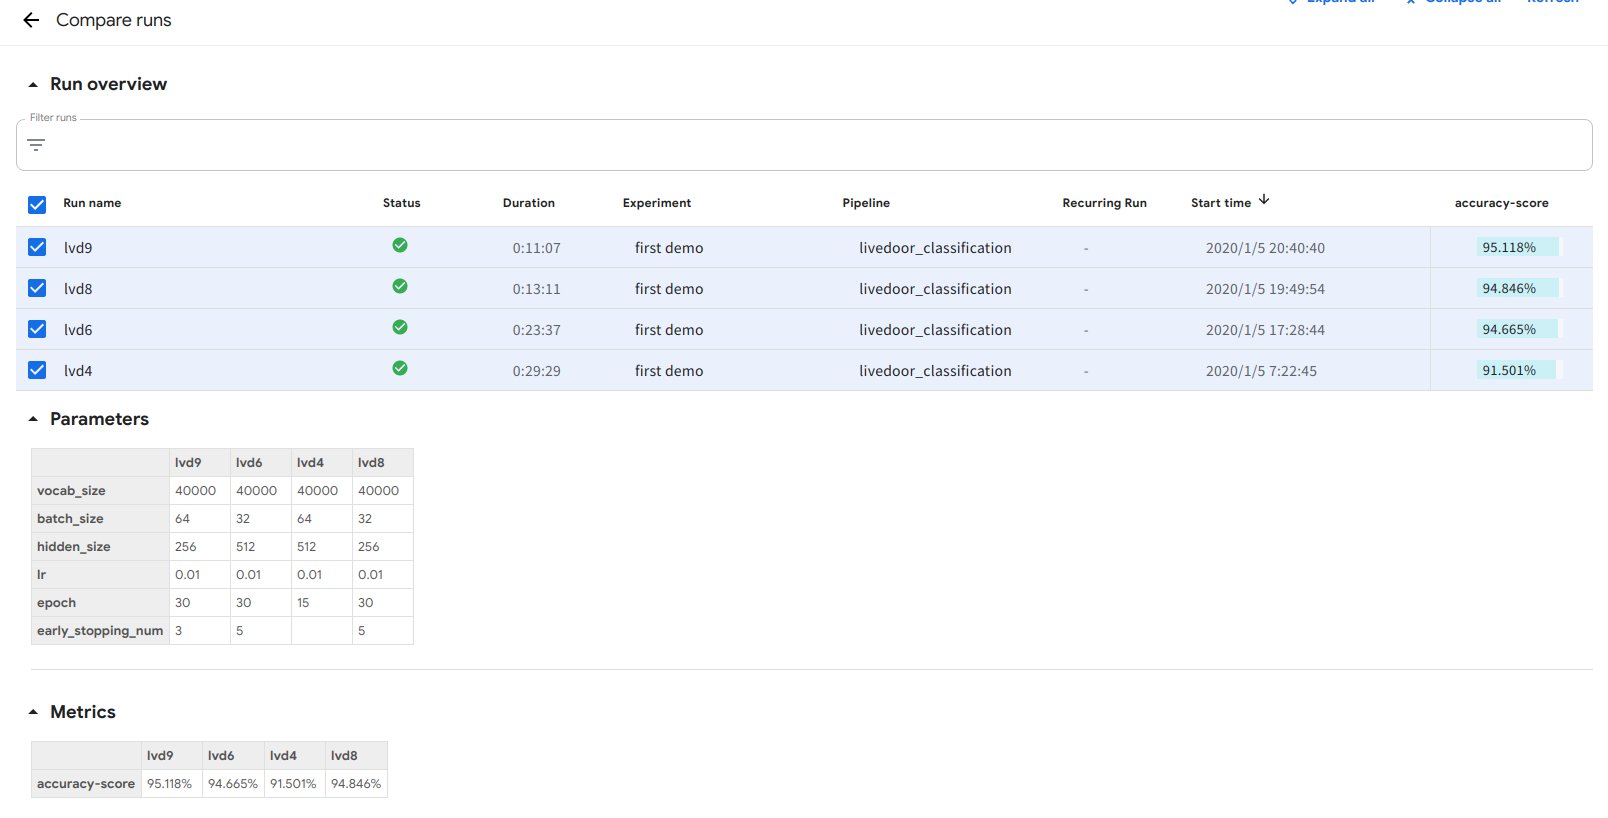
いくつかパラメータを変えながらRunを回した結果の比較を次の通りです。
データ数がそれほど多くないためすぐに過学習してしまう傾向にあるようです。early stoppingがうまく作用しています。
Confusion Matrixは次の通りです。

これらが全てKubeflow PipelinesのUI上で確認できるのは非常に便利です。
実験結果を管理して試行錯誤を繰り返しながら、最も良い結果が出た学習方法をデイリーのJobとしてPipelinesに載せ毎日デプロイするといったことをKubeflow上で完結できることがMLワークフローエンジンとして設計されているKubeflowの利点ではないかと思います。
まとめ
この記事ではKubeflowの紹介から始まり、Pipelinesの説明、実際に日本語のデータセットを使った例を作成しました。
MLOpsを実行することを前提に設計されているため非常に高い完成度を誇っています。
またWorkload Identityを中心とした認証・認可の仕組みが提供されているのは、組織として使う上では非常に嬉しい点であると思います。
反面、Kubeflowは非常に大きなツール群であるため、既存のワークフローへの装着は骨が折れそうという印象があります。
幸い、各ツールはkustomizeを使って管理されているため部分的に切り出して使うというやり方が楽かもしれません。
質問やコメントは、この記事やTwitterへお願いします。
参考文献
- https://github.com/kubeflow/kubeflow
- https://www.kubeflow.org/docs/fairing/
- https://github.com/kubeflow/katib
- https://www.kubeflow.org/docs/pipelines/
- https://github.com/argoproj/argo
- Kubernetes とGCPの世界をつなぐアクセス管理のはなし
- https://www.kubeflow.org/docs/gke/authentication/
- https://www.kubeflow.org/docs/gke/pipelines/authentication-pipelines/
- https://github.com/kubeflow/examples/blob/master/pipelines/mnist-pipelines/mnist_pipeline.py
- livedoor ニュースコーパス
- AllenNLPで簡単にDeepな自然言語処理
- AllenNLP
- Challenges for Machine Learning Systems toward Continuous Improvement
- Future of MLOps - Luke's Bristech talk